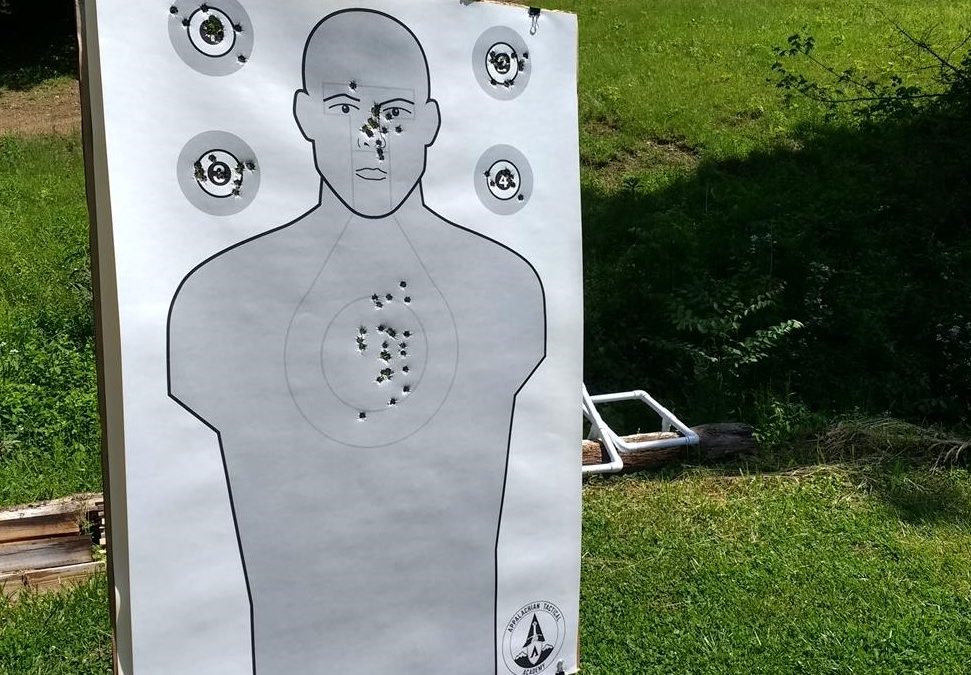
Meet Johnny Ringo, the star of ATA’s newest custom training target. Mr. Ringo is an educated man, and he has agreed to help train prospective gunfighters seeking instruction from Appalachian Tactical Academy. He’s made out of heavy-duty cardstock, which means he’s very durable and weather-resistant. He’s also more affordable and less time-consuming to produce than my old setup which consisted of IPSC silhouettes matched with B-8 Repair Centers and hand-drawn sharpie lines. These new targets are also a lot nicer and more professional-looking than the old targets, and they feature the ATA Logo so you know they’re ours.
They were custom made to my design specifications by Targets Online. Speaking of that, I want to throw them a shout-out: Targets Online is an awesome business to deal with. My point of contact was Joe, and he is as friendly and helpful as a man can be. After trying my luck with several different custom target printers, and getting nobody to return my inquiries, I finally found Targets Online. Where most other companies require minimum orders of 2500+ targets, TO has a minimum order of 1000, and produces their targets at very reasonable rates. They can print their exceptionally clean designs on either paper or high-quality cardstock, which is their signature product. The turnaround was amazingly fast, too: the whole design and purchase process took only 16 days from my first contact with Joe until I had my targets in hand. TO doesn’t just produce large runs of custom targets, though – they also have a variety of photo-realistic targets, training targets, and “realistic” zombie targets on hand, as well as other high-quality targetry and accessories. Please go check them out on their website and like their Facebook page!
You’re No Daisy At All
Alumni of ATA training classes should immediately recognize the purpose behind the design of this target and all its different uses. For any who still haven’t had the fortuitous experience of training in the hills of Keavy, I’ll give you a breakdown of the target design.
We’ll start with the circle/bullseye designs. The inner black dot is 1″ in diameter, and any graduate of ATA Pistol I will recognize those as the targets we use to drill the fundamentals of marksmanship. In the past, I have printed up 8.5″x11″ sheets full of 1″ dots and then just spray-glued them to the training target for this drill. You can download a .pdf of that target and print them out for yourself here, by the way.
The white portion around the 1″ dot is a 2″ circle. 2″ circles are a really versatile target for working accuracy at speed. There are lots of different drills you can do with them. The outer grey ring is 3.5″. I use that portion the same way I use the DEA Dot target – for command training and drills that force you to think through what you’re doing.
Moving on to Johnny Ringo himself: the silhouette is actually shaped more-or-less like a real human body, as opposed to the stylized version you typically see with IDPA/ISPC targets. Shooting at a realistic silhouette is important for two reasons. First, as explained by Lt. Col. Dave Grossman in his book On Killing, it’s important for developing the psychological readiness needed for shooting at another real human being. Secondly, it’s useful to be able to see where your shots need to actually be placed on a real human body. Targeting is important, and the old-school phrasing of shooting “center mass” is bad advice. Many older silhouette targets reinforce this bad teaching by placing an X-ring near the belly button.
“Scoring” rings have been added to highlight the high center chest aiming area, the headshot T-Box, and the thoracic triangle. The high center chest area, or the “heart box” is 5.5″ in diameter – the same size as the black part of a B-8 bullseye target. I like using smaller target areas than standard 8-inch “chest zones” because it more accurately represents the size of the target you need to actually hit. Accuracy is the foundation of gunfighting, and you’re not doing yourself any good setting low standards by shooting at huge targets.
The lines are faint enough to be hard to see at distances of 10 yards and farther. This helps more advanced students train by giving you a way of “scoring” your hits without giving any extra visual reference of where to aim other than the shape of the silhouette/face itself. At closer ranges, the circles are easier to see, and that helps beginning students by showing them exactly where they need to aim on a life-like human shape.
You’ve probably noticed that poor old Johnny Ringo doesn’t have any arms and isn’t holding a gun or other weapon. That’s because for its most basic use, we don’t need any of that stuff. For shoot/no-shoot scenarios, I intend to add target indicators by using stencils. That way Johnny stays versatile. I can make him into a shoot or a no-shoot target as needed.
Play For Blood… Remember?
Well there you have it. You’ve now been introduced to Johnny Ringo, the newest member of the training staff here at ATA. You’ll be able to see him in all of our training classes, and we’ll even have him available for you to take home if you’re interested in buying some targets to use for your own continuing practice. Make sure to sign up for a class so you can be the first to meet him in person! We’ve got ATA Pistol I and ATA Rifle I coming up this weekend, and there’s still space left in both. Click the buttons below for more information on how to register.


